While designing my cruising beach cat, I had one thing on my mind... EASY. Although there is nothing like sailing a high performance beach cat, they can be a hand full both on and off the water. So I set out to build a cat that would increase my fun to work ratio by making the boat easy to deal with on the beach and on the water, and if that meant that some speed had to be sacrificed, so be it. The requirements were simple:
To accomplishing these requirements I combined two concepts:
I decided on a 14' hull because the boat had to be easy to handle on land and this was my first boat building project so I wanted to keep it small. I think next time I'll go with 16' because the plywood for the hulls comes in 4' x 8' pieces and so 16' is the biggest you can go with only one scarf joint.
I found information on the crab claw rig through some internet searching and it seemed the perfect fit so I decided to try it out (see following section on the crab claw).
The popular Bermudan sail with rotating mast featured on most production catamarans exhibits great upwind performance, which is why it is so successful on racing boats where upwind performance is king, but it does have several drawbacks:
The Polynesian crab claw overcomes all of these drawbacks at the cost of some upwind performance. Since the crab claw requires simple round spars for the mast, boom and yard I could make them myself from carbon fiber and fiberglass. And the crab claw sail works best when it is cut perfectly flat, so I could do that myself too. In addition, this rig doesn't create loads as large as those of the Bermudan rig and so all of the components can be made lighter.
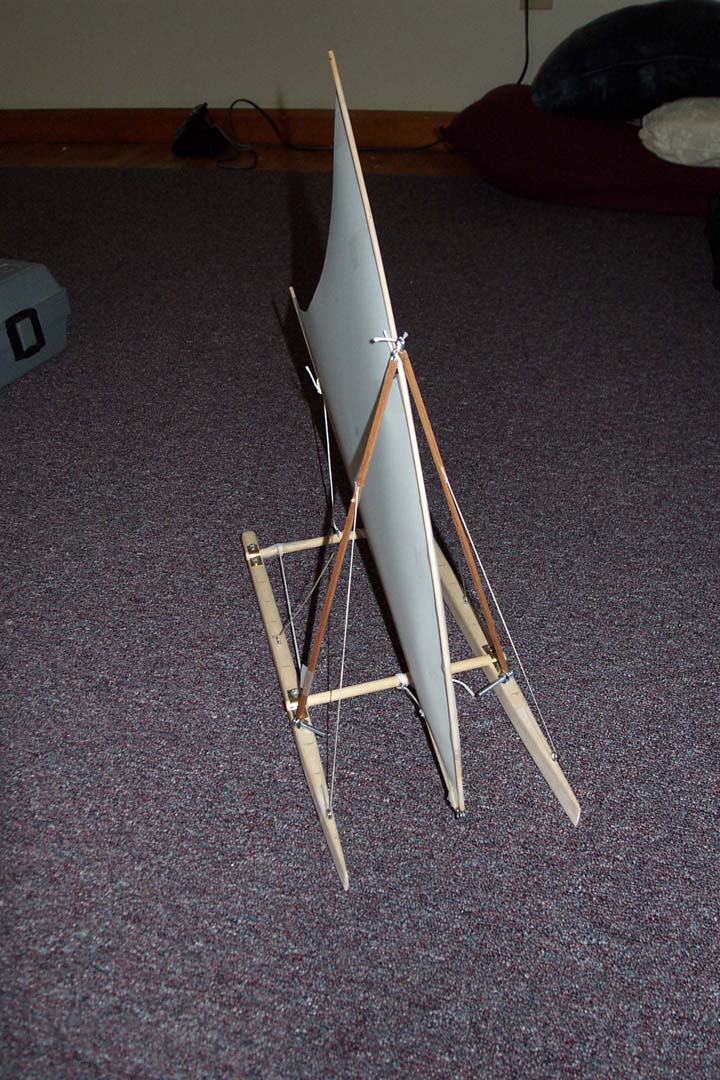
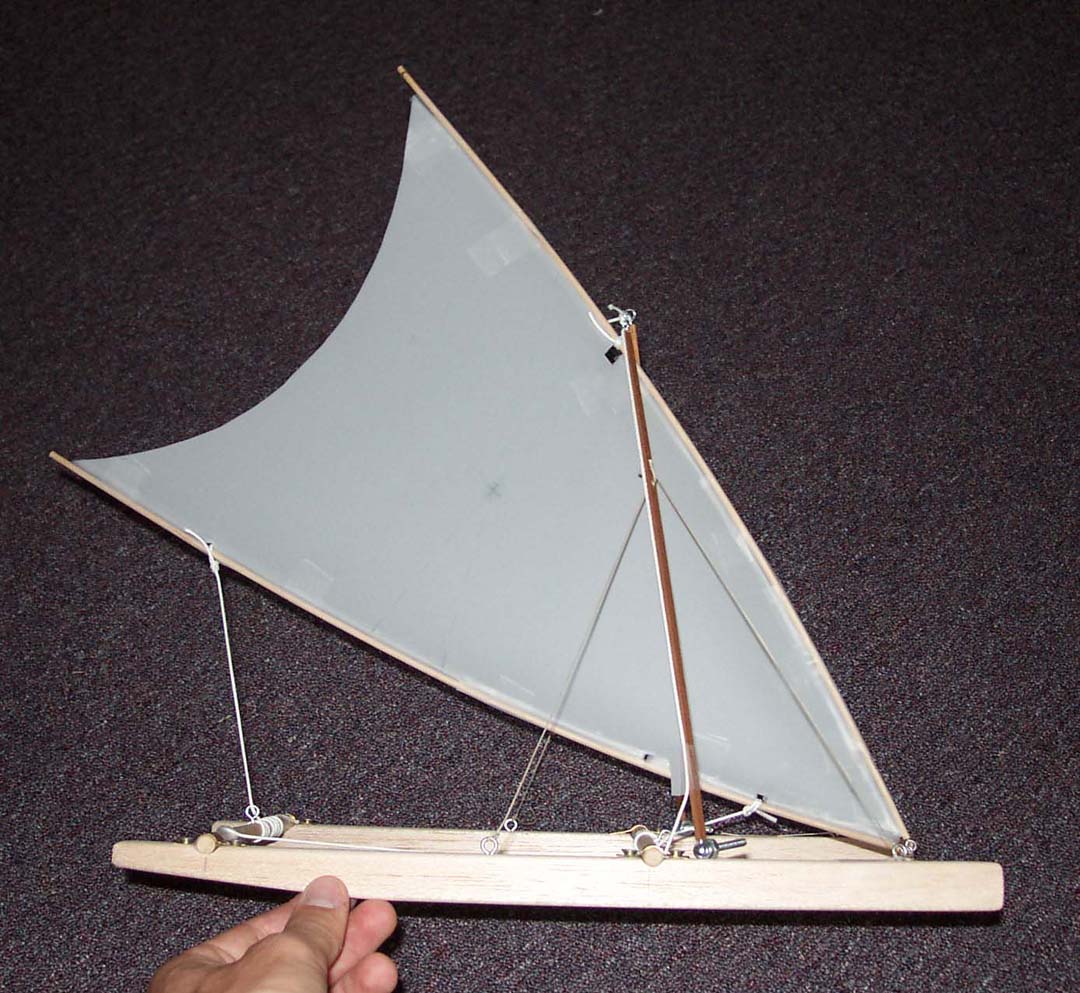
Prior to this project I had no experience with crab claw sails (other than on a sailfish) or a bipod mast, which allows the crab claw to tack without the mast distorting the sail shape. Below are pictures of the sail plan I used and a scale model I made to figure out how the rig, with bipod mast, would be set up.

The analysis of the loads on the bipod mast is an interesting one. Because the base of each mast is connected to hulls, and not in the center of the crossbeam, the shrouds (also connected to the hulls) have no ability to pull sideways on the mast the way a traditional rig does. Instead, the shrouds (one head stay and one back stay for each mast) only serve to control the fore/aft tilt of the masts (which can be easily adjusted to move the sail's center of effort). When the sail forces push sideways on the masts, all of the lateral force is turned into compression of the leeward mast and tension in the windward mast. A static analysis of these forces is linked below:
Free body diagram analysis of the mast forces.
Since long slender structures tend to buckle under large compressive loads, the masts have to be very strong to avoid failure, which is why I chose to construct the masts out of carbon fiber. My masts are approximately 12' long and 2 1/2" in diameter with a 1/8" wall thickness. Ideally, they would be very small with a airfoil cross section to minimize their aerodynamic drag. I may eventually try to fit a thin foil shaped shell over the masts to reduce the drag if it seems worthwhile.
Weight on any catamaran is paramount. Any design becomes instantly faster whenever a significant amount of weight can be eliminated because weight relates directly to hull drag. With this in mind, I set out to make the hulls (the biggest component) as light as possible. The best method of construction available was tortured plywood construction because it does not require a mold, is relatively inexpensive and results in a very light hull. Based on the density of plywood and the hull design, I estimated that I could create a 14' long plywood hull weighing less than 50 lb with a total boat weight of under 200 lbs.
Next, I wanted to estimate the sail area I would need. To do this, I examined the specifications of various beach cats summarized in the table below. When comparing the sail area of different size boats, it is necessary to calculate a dimensionless parameter such as:
sail area/displacement^(2/3)
Since a boats displacement (weight) increases as length^3 while sail area only increases as length^2 this parameter will yield a number that can be used to compare boats of different sizes. To have something to compare to, I gathered specifications on various production beach cats and summarized them in the table of below (Crew weights listed are the minimum class weight for racing. If there is no class weight I assumed 150 lb for single handed boats).

As you can see, I found that for all the boats under 16' in length, the average value of this sail area-displacement parameter was about 34, giving a sail area for my boat of about 100 square feet.
Being partial to nacra hull designs, I modeled my hulls after the nacra 5.0 (sharp tall bows with a rising stern and a long skeg instead of dagger boards). But before I started cutting, I did a little analysis of different hull shapes. To estimate the relative amounts of drag on different shapes I calculated the wetted surface for a given displacement/weight per unit length. The results shown are the relative amount of wetted surface area for the various shapes normalized to the results for an ellipse, which had the lowest value. Therefore, the smaller the number, the lower the wetted surface area. For example, the triangular hull shape has 2.4 times as much wetted surface as the ellipse (for all shapes except the circle, the aspect ratio 'height/width' = 2:1 representative of the middle portions on the hull where most of the buoyancy is located).
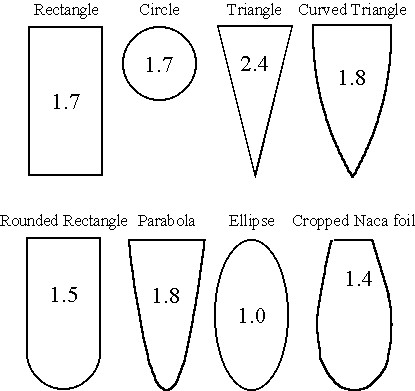
This analysis shows that for a hull of uniform cross section floating in still water, the ellipse has by far the least amount of wetted surface for a given displacement/weight. It also shows that the triangular hull shape is by far the worst. The rest of the shapes are comparable. However, minimizing wetted surface area is not the only consideration when designing a hull. Since in reality the hull will be traveling through waves, a sharp hull shape will offer less wave resistance and a smoother ride. Based on these results I decided that the nacra hull shape (closest to the ellipse) was indeed the best shape and so I stuck with it.
However, it does seem that the curved triangle shape, while it does possess an 80% increase in wetted surface area, could produce a very smoothly riding hull that would not require a skeg or dagger board and the extra drag associated with such foils (see the G-cat design). This shape seems to have a lot of potential for a cruising cat and after seeing how hard it can be to bend plywood around tight radii, I can appreciate how much easier it would be to build using plywood.
Here is a Pugh chart weighing each shapes pros & cons with my own weighting system, looking back now, I think I would go with the curved triangular hull if I build another cat.
To contact me write to kseluga@rclandsailing.com
